Every beautiful celebration has that one detail that makes guests stop and say, “Wow.” The food may be ready, the cake may be waiting, and the invitations may already be in everyone’s hands, but the right decoration brings the entire party space to life. I have always loved how simple handmade decorations can completely transform an ordinary room into a magical place filled with excitement and memories.
That is exactly why learning how to make a tissue paper pom pom backdrop is such a wonderful party skill. These fluffy, colorful decorations add charm, texture, and a dreamy touch to birthdays, baby showers, sleepovers, graduations, and holiday celebrations. They create the perfect photo backdrop and make children feel like they have stepped into something truly special.
This guide will help you: How to Make a Beautiful DIY Balloon Garland for a Birthday Party
The best part is that you do not need advanced crafting skills or expensive supplies to create something beautiful. With just tissue paper, scissors, string or wire, and a little creativity, you can design a stunning backdrop that looks professionally made. If you love creating eye-catching party decorations, you may also enjoy this beginner-friendly balloon arch tutorial for another show-stopping party display.
Keep reading to discover how to make tissue paper pom poms, choose the perfect colors and sizes, hang your backdrop with ease, and style everything so your celebration looks full, polished, and absolutely magical.
See this guide: How to Make a Balloon Arch for a Kids Party (Beginner-Friendly Tutorial)
By the end, you will have a beautiful backdrop that looks impressive, photographs beautifully, and makes your celebration feel extra special without spending a huge amount of money or time.
What Is a Tissue Paper Pom Pom Backdrop and Why Does Every Kids’ Party Need One
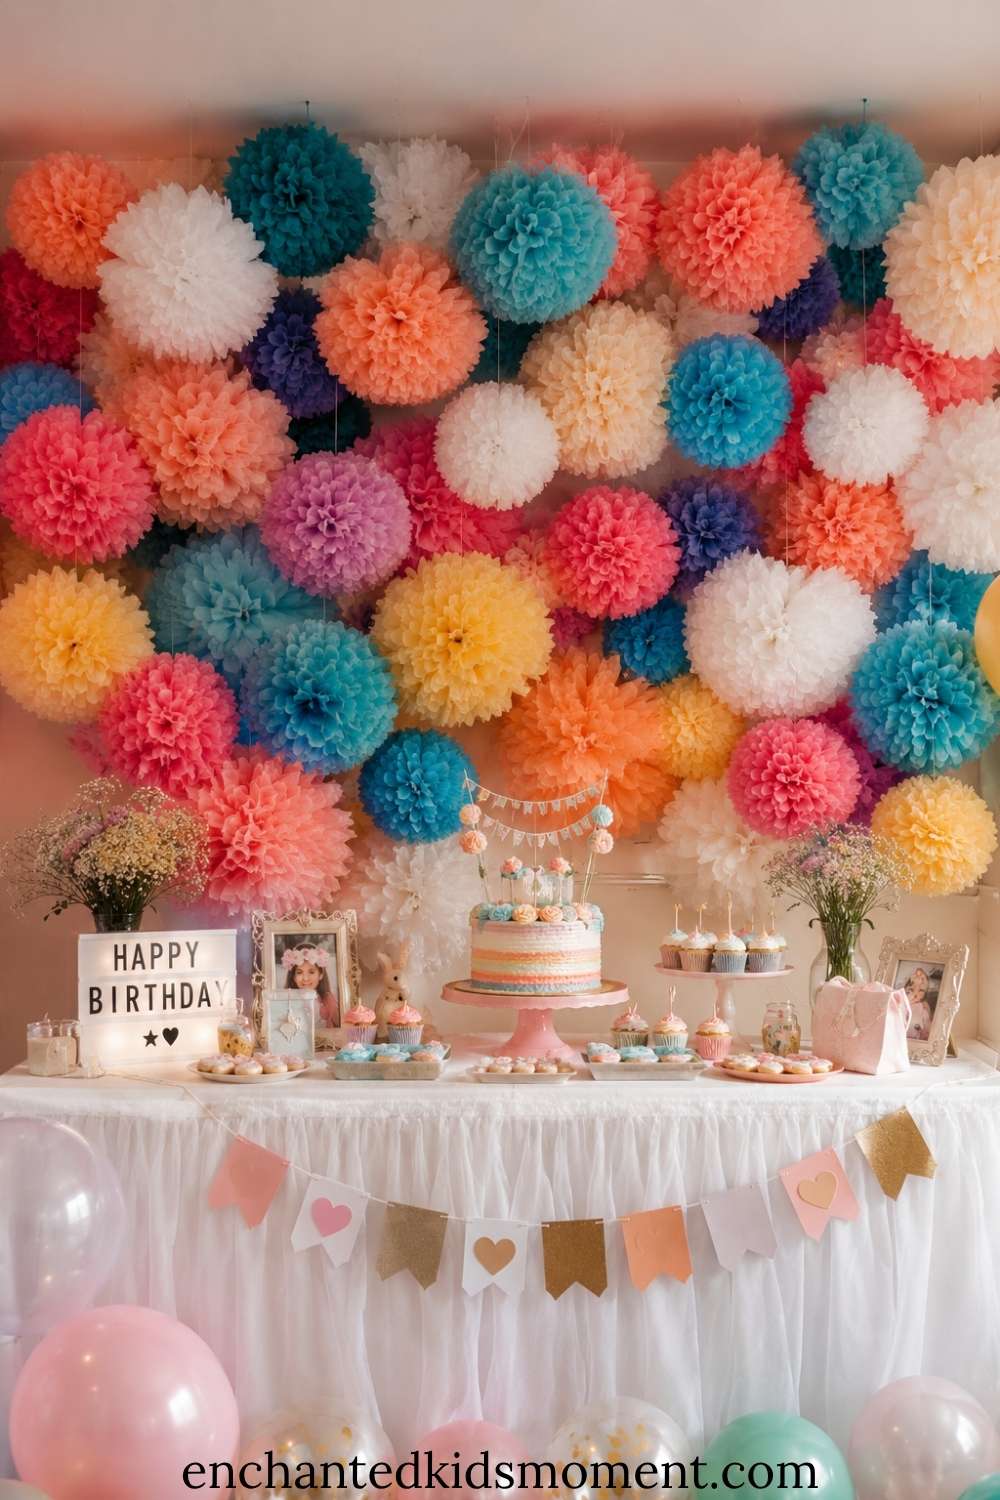
A tissue paper pom pom backdrop is a wall display made from multiple layered tissue paper pom poms in coordinating colors, hung at varying heights to create a full, textured, visually stunning background. It works as a photo backdrop, a focal wall behind the cake table, a welcome display at the party entrance, or a decorative feature behind the birthday child’s chair.
The reason tissue paper pom pom backdrops have remained one of the most popular DIY party decorations for years is simple they deliver an enormous visual impact for an almost laughably small investment. A pack of tissue paper costs a few dollars. A roll of fishing line or twine costs almost nothing. The technique takes about three minutes per pom pom once you get into a rhythm. Scale them up, cluster them together in the right colors, and the result genuinely looks like something from a styled editorial shoot.
Save this for later: How to Make a Beautiful DIY Balloon Garland for a Birthday Party
Furthermore, tissue paper pom poms are endlessly versatile. They work for every party theme imaginable a pastel rainbow backdrop for a unicorn party, bold primary colors for a Bluey or superhero theme, peach and gold for a princess party, red and blue for a patriotic 4th of July celebration, or pink and white for a first birthday. The same technique applies every time. Only the colors change.
Additionally, pom pom backdrops photograph beautifully under any lighting condition. Natural light makes them glow softly. Party lighting makes them pop dramatically. Flash photography picks up every layer of tissue. Whatever camera captures the moment a professional DSLR or a phone held by a grandparent the backdrop makes every photo look intentional and beautiful.
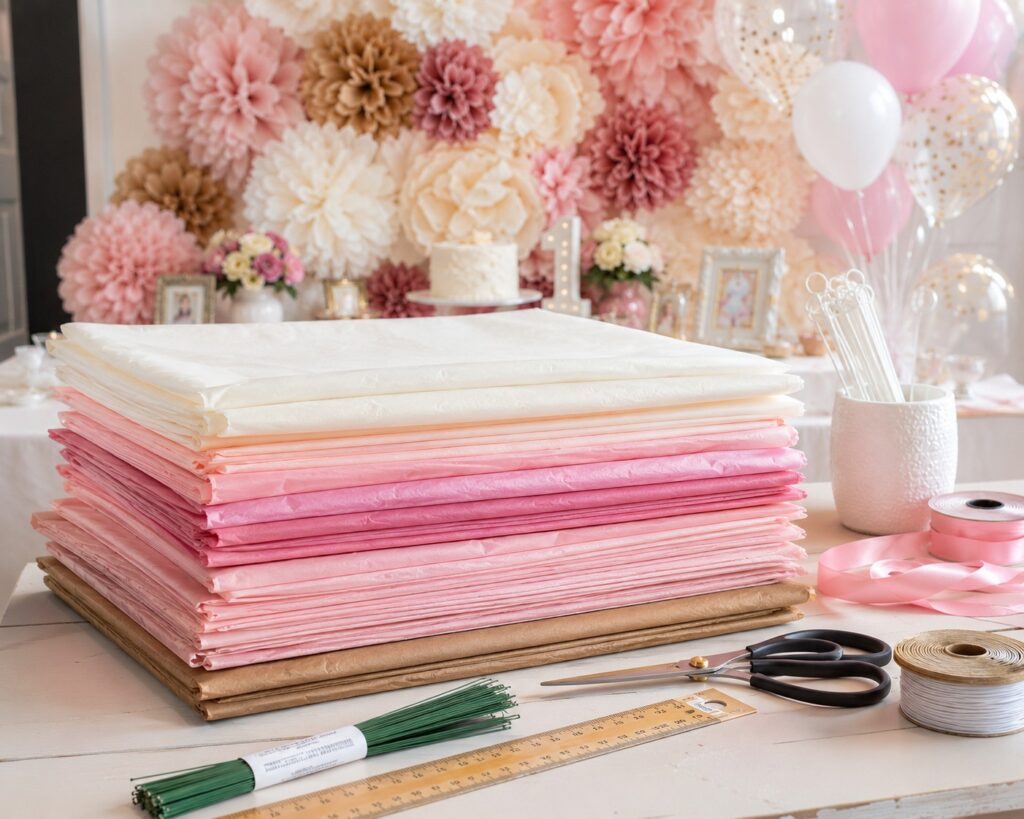
Supplies You Need to Make the Backdrop
Getting your supplies together before you start is the single most important step in making the 30-minute timeline work. Stopping mid-project to hunt for scissors or untangle wire adds time and frustration that is entirely avoidable. Gather everything listed below and lay it out on a clear table before you begin.
For the pom poms:
- Tissue paper in your chosen colors standard 20×26 inch sheets work perfectly. Plan for approximately eight to ten sheets per pom pom
- Sharp scissors dull scissors drag on tissue paper and slow you down significantly
- Thin floral wire, pipe cleaners, or twist ties one per pom pom for securing the centre
- A flat, clear surface to work on
Learn more here: 17 Fairy Birthday Party Ideas That Will Turn Your Kids Party Into a Real-Life Fairytale
For the backdrop display:
- Fishing line, twine, ribbon, or thin string for hanging individual pom poms
- A tension rod, curtain rod, or dowel that spans your display area or command strips and hooks for a wall-mounted approach
- Scissors for cutting hanging lengths
- A measuring tape
- A step stool or ladder for reaching the hanging point safely
Optional but helpful:
- A pencil for marking wall positions before placing hooks
- Washi tape for temporary wall attachment without hooks
- Extra tissue paper for filling gaps once the backdrop is assembled
The total cost of supplies for a full backdrop approximately 15 to 20 pom poms covering a standard 6-foot wall section runs between $15 and $30 depending on where you source your tissue paper. Dollar stores, craft stores, and online retailers all carry tissue paper in wide color ranges. Buying in bulk packs always offers the best value.
How to Choose the Right Colors
Color selection is where the magic happens and where many first-time pom pom makers make their biggest mistake. The mistake is choosing too many colors without a unifying strategy. A backdrop with eight random colors looks chaotic. A backdrop with three to four carefully chosen colors in varying shades looks intentional, cohesive, and genuinely stunning.
The most reliable approach is to choose one dominant color, one complementary color, and one neutral. For a Bluey party royal blue as the dominant, orange as the complementary, and white as the neutral. If you are going for a unicorn party lavender as the dominant, soft pink as the complementary, and gold or white as the neutral. For a 4th of July celebration red as the dominant, white as the complementary, and navy as the deep anchor color.
This guide will help you: 20+ Bluey Birthday Party Ideas That Will Make Your Toddler’s Day
Varying shades within your dominant color adds depth without visual chaos. Pairing sky blue pom poms with royal blue tissue pom poms and navy pom poms creates a sophisticated monochromatic layer that looks deliberate and beautiful rather than flat. Adding a single bright accent color — orange among blues, gold among pinks, red among greens makes the whole display feel alive and dynamic.
Vary your pom pom sizes too. Large pom poms of 14 to 16 inches in your dominant color form the anchors of the display. Medium pom poms of 10 to 12 inches in your complementary color fill the body of the backdrop. Small pom poms of 6 to 8 inches in your neutral or accent color tuck into gaps and add textural variety. This three-size approach is the professional party stylist’s core technique and it makes a dramatic difference to the finished result.
Step-by-Step Tutorial
Now that your supplies are gathered and your color palette is chosen, it is time to make your pom poms. Read through all the steps once before starting so the process flows smoothly from beginning to end.
Don’t lose this: 31 Beautiful Balloon Decoration Ideas for Kids’ Parties That Will Absolutely Wow Every Guest
Step 1: Stack Your Tissue Paper Sheets for the Tissue Paper Pom Poms
Lay eight to ten sheets of tissue paper in a flat, even stack on your work surface. For a large pom pom, use the full 20×26 inch sheet. If you are going for a medium pom pom, trim the sheets to approximately 15×20 inches before stacking. For a small pom pom, trim to 10×13 inches. Keep all sheets perfectly aligned at the edges misaligned sheets produce uneven pom poms that do not fan out symmetrically.
You can layer two or three colors within the same pom pom for a beautiful two-tone or ombre effect. Alternate the colors as you stack one sheet of blue, one sheet of white, one sheet of blue for a subtle stripe effect when fanned out.
Step 2: Fold the Stack Accordion Style
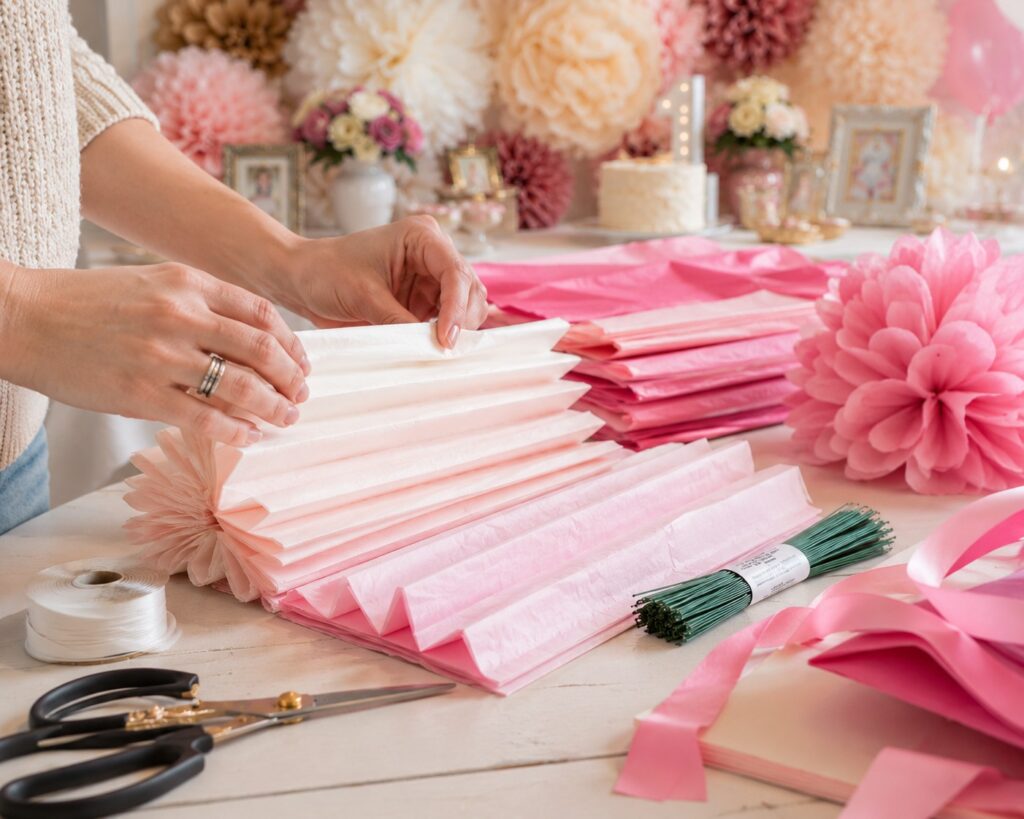
Starting at one of the short ends, fold approximately one inch of the tissue paper stack upward. Flip the entire stack over and fold the next inch in the same direction. Continue flipping and folding until the entire stack is accordion-folded into a flat, pleated rectangle. Keep your folds as even as possible consistent folds produce rounder, fuller pom poms. The fold width determines the petal width of the finished pom pom. Narrower folds create more delicate, frilly petals. Wider folds create bold, chunky petals.
Step 3: Secure the Centre
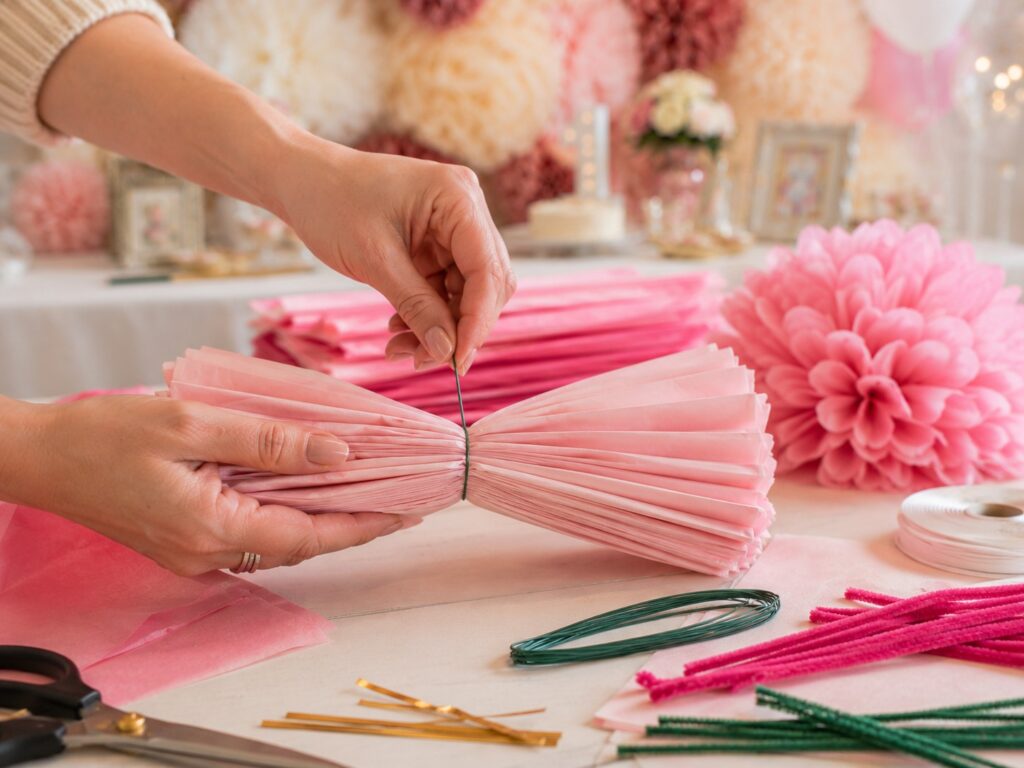
Pinch the accordion-folded stack firmly in the centre. Wrap a piece of floral wire, a pipe cleaner, or a twist tie tightly around the very centre point and twist to secure. This centre wire is the structural core of the pom pom and needs to be genuinely tight, a loose centre produces a pom pom that droops and loses its shape. Leave a small tail of wire extending from the centre, you will use this to attach your hanging string later.
Step 4: Round the Ends
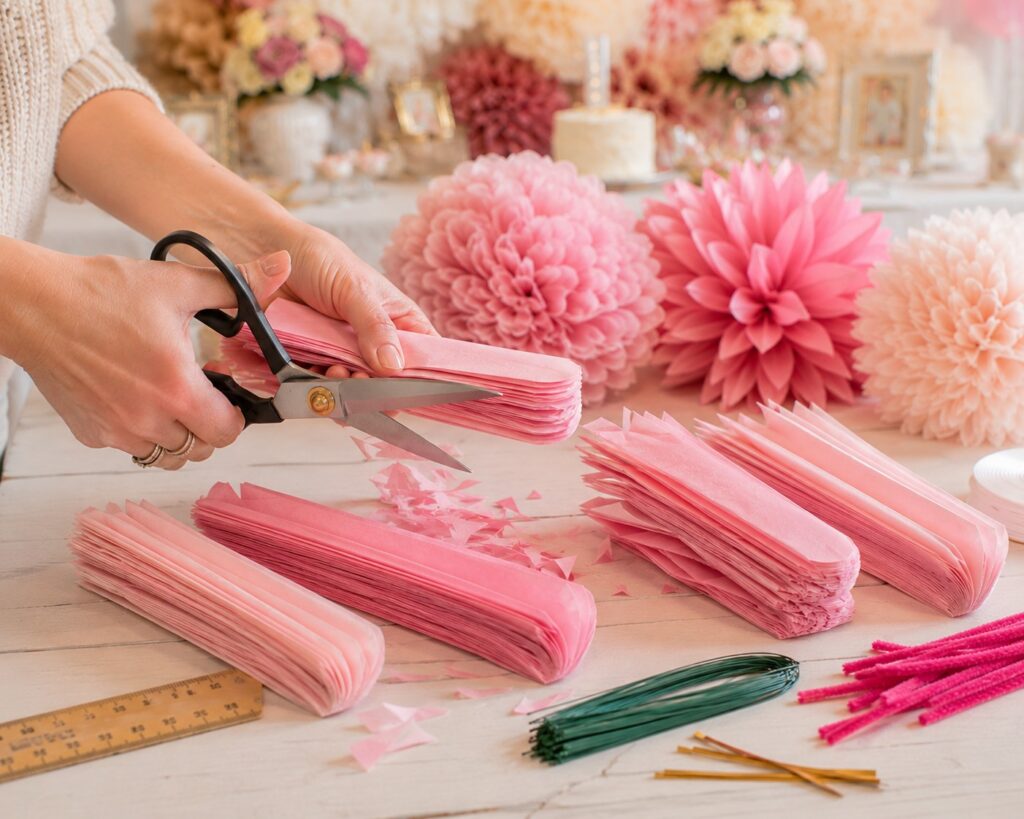
Before fanning the pom pom open, shape the ends of the accordion-folded stack. Pointed ends create a star-burst or dahlia effect. Rounded ends create a classic full pom pom effect. Fringed ends — made by cutting small parallel slits along each end create an incredibly full, textured cloud effect that looks especially beautiful in large sizes. Choose your end style and cut both ends of the folded stack to match before moving on.
Open this page next: 15+ Magical Unicorn Birthday Party Ideas That Will Blow Your Little One’s Mind
Use sharp scissors and cut through all layers at once with a confident, smooth stroke. Hesitant cutting produces jagged edges that show in the finished pom pom.
Step 5: Fan Out the Layers
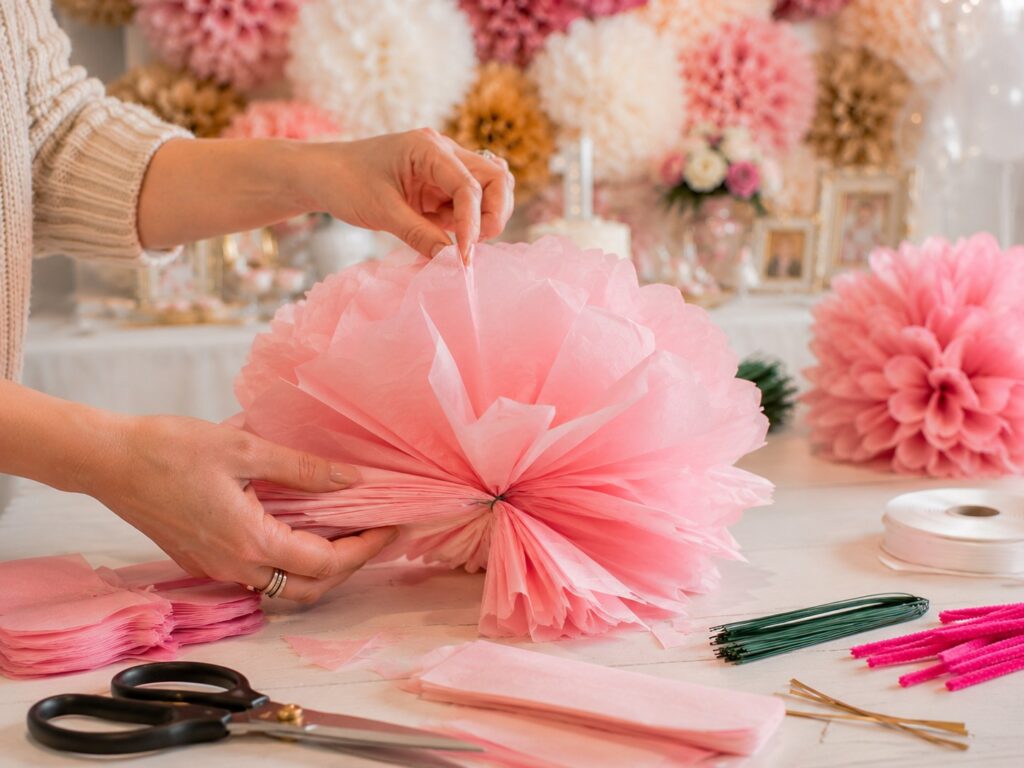
Hold the secured centre firmly in one hand. With the other hand, gently pull the top layer of tissue paper upward and toward the centre, separating it from the layer beneath. Work slowly and carefully — tissue paper tears easily when rushed. Pull each individual layer upward and inward, working from the top down on one side, then flipping and repeating on the other side.
Once all layers on both sides are fanned upward, gently fluff and shape the pom pom by separating individual sheets further and pushing layers outward from the centre to create a full, round ball shape. Spend 30 to 60 seconds on this shaping step the difference between a flat, underwhelming pom pom and a full, glorious one is almost entirely in how well you fan and shape the layers.
Step 6: Attach the Hanging String
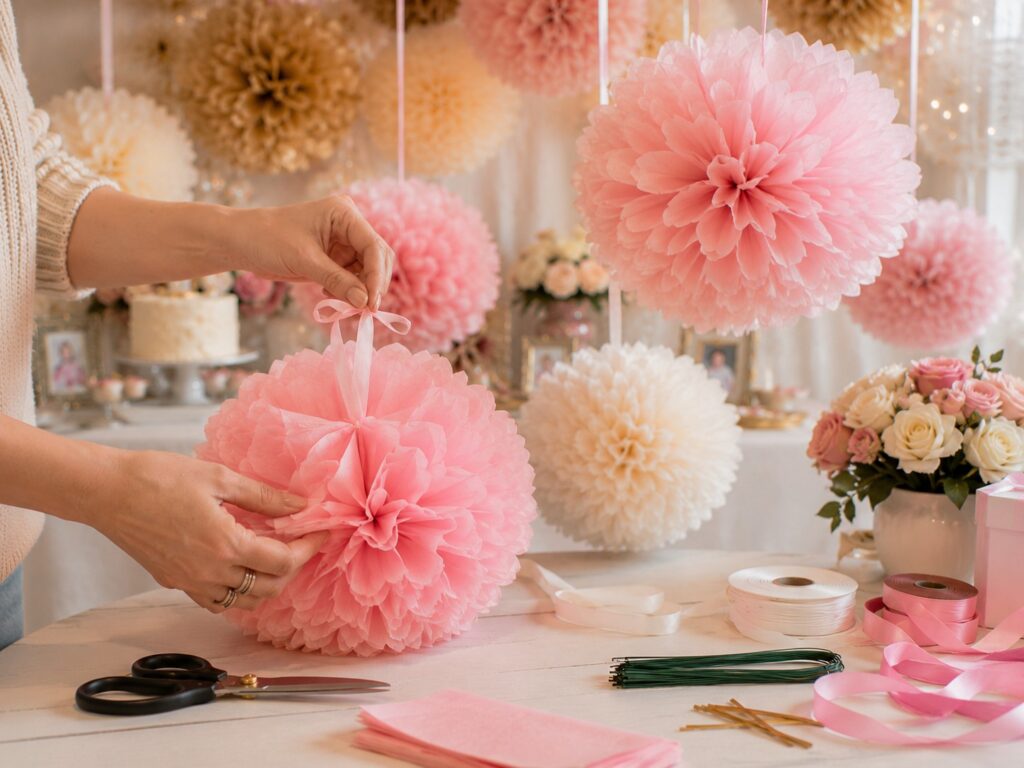
Thread your fishing line, twine, or ribbon through the wire loop at the centre of the pom pom and tie it securely. Cut the hanging string to your desired length vary the lengths across different pom poms to create the cascading, layered look that makes pom pom backdrops so visually dramatic. Longer strings for the outer edges, shorter strings for the centre, and varying lengths in between creates a beautiful arched or cloud-like silhouette.
Bookmark this: How to Make a Colourful Patriotic Flower Arrangement With Your Kids (Step-by-Step)
Repeat this process for each pom pom. Once you are in the folding rhythm, each pom pom takes approximately two to three minutes from stacking to hanging string. A backdrop of 15 pom poms takes approximately 30 to 45 minutes in total.
How to Hang Your Tissue Paper Pom Pom Backdrop
Hanging the backdrop correctly is just as important as making the pom poms themselves. A beautifully made set of pom poms displayed on a poorly executed backing looks disappointing. A thoughtfully hung backdrop at the right height, with the right spacing, in the right location looks absolutely spectacular.
Using a Tension Rod or Dowel to hang tissue pom poms

The cleanest and most damage-free hanging method uses a tension rod or wooden dowel spanning the width of your display area. Tie each pom pom’s hanging string directly to the rod at your desired spacing. This method allows you to adjust positions easily before committing, slide pom poms left or right to fill gaps, and remove the entire backdrop in one piece at the end of the party.
Position the rod or dowel at the correct height before attaching pom poms typically about 18 to 24 inches below the ceiling for a standard 8-foot ceiling. Use two command hooks rated for the combined weight of the rod and pom poms to hold the rod in place without drilling.
Using Command Strips and Hooks Directly on the Wall
For a wall-mounted approach without a rod, use removable command hooks positioned in a horizontal row along the wall at your desired height. Tie each tissue paper pom pom hanging string to its own hook. This method works particularly well for creating a cascading arrangement where each pom pom hangs at a slightly different height — simply adjust the string length rather than the hook position.
Always check the weight limit on your chosen command hooks before hanging. Tissue paper pom poms are extremely lightweight, but a large backdrop of 20 pom poms on a single hook will eventually cause even a high-rated hook to fail.
Spacing and Arrangement Tips for Tissue Paper Pom Pom
Start hanging from the centre of your display area and work outward in both directions. Place your largest pom poms first as anchor points, then fill in with medium and small sizes. Overlap pom poms slightly so no wall is visible between them gaps in a pom pom backdrop immediately make it look unfinished. Step back every few additions to assess the overall shape and balance from a distance.
Aim for a slightly arched lower edge pom poms at the outer edges hanging slightly lower than those at the centre rather than a perfectly straight horizontal line. The arch creates a soft, organic silhouette that looks far more polished and intentional than a rigid straight edge.
Styling Your Tissue Paper Pom Pom Backdrop for Maximum Impact
Making and hanging the pom poms is the foundation. Styling the space around them elevates the entire display from pretty to genuinely stunning. These finishing touches take an additional 10 to 15 minutes and make an enormous difference to the overall effect.
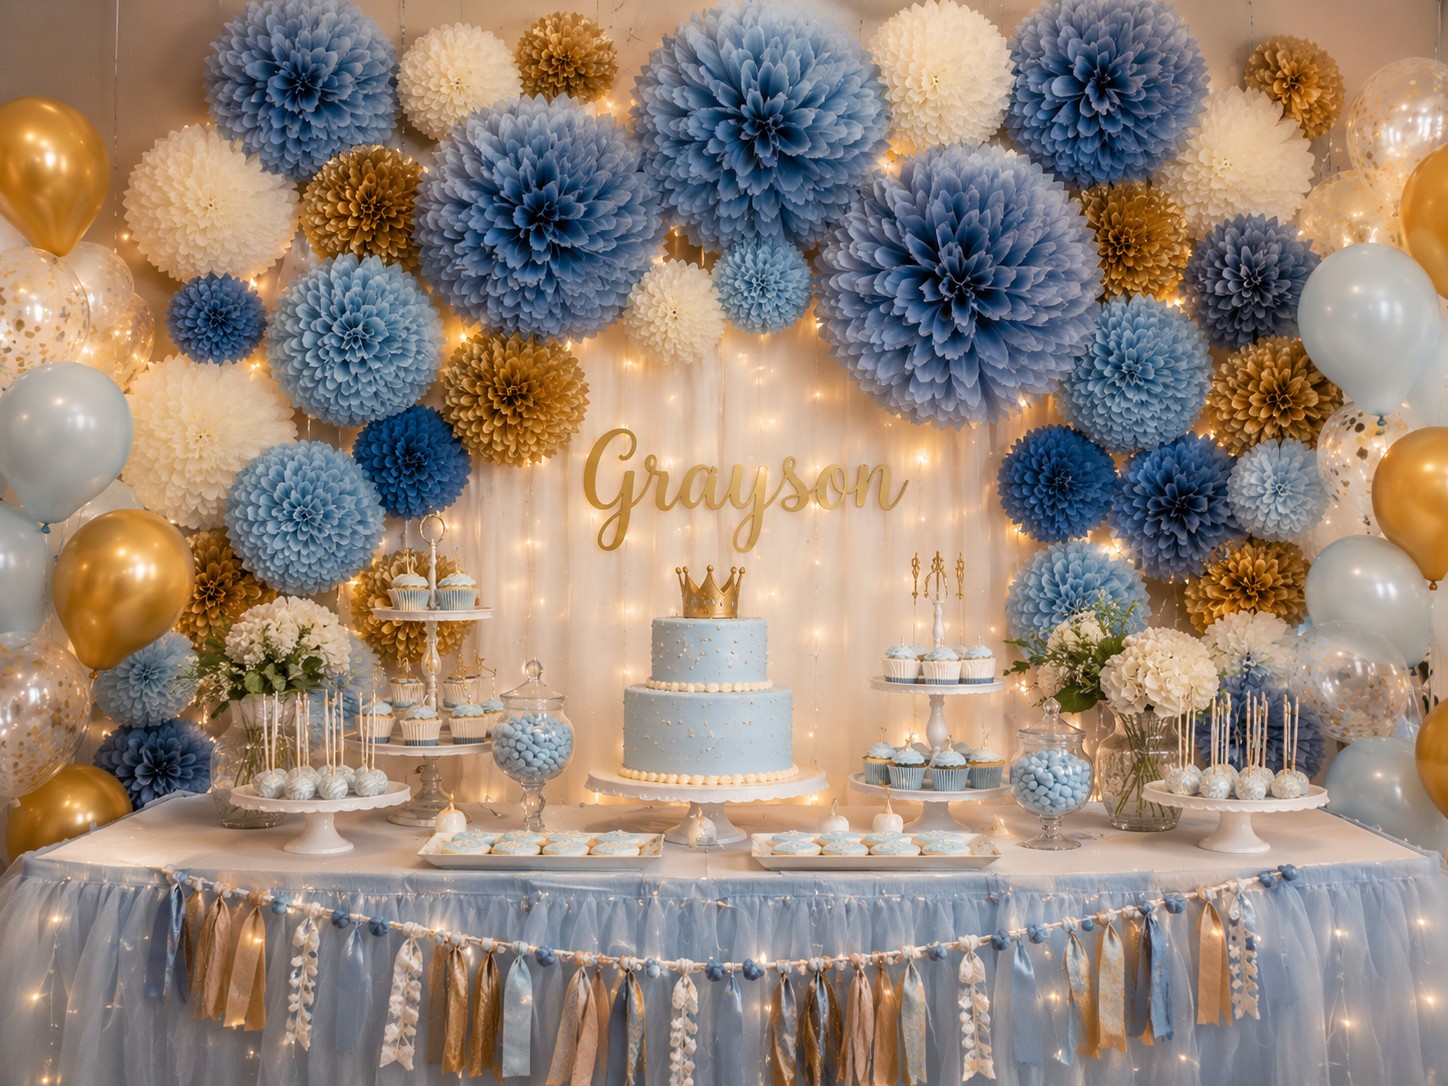
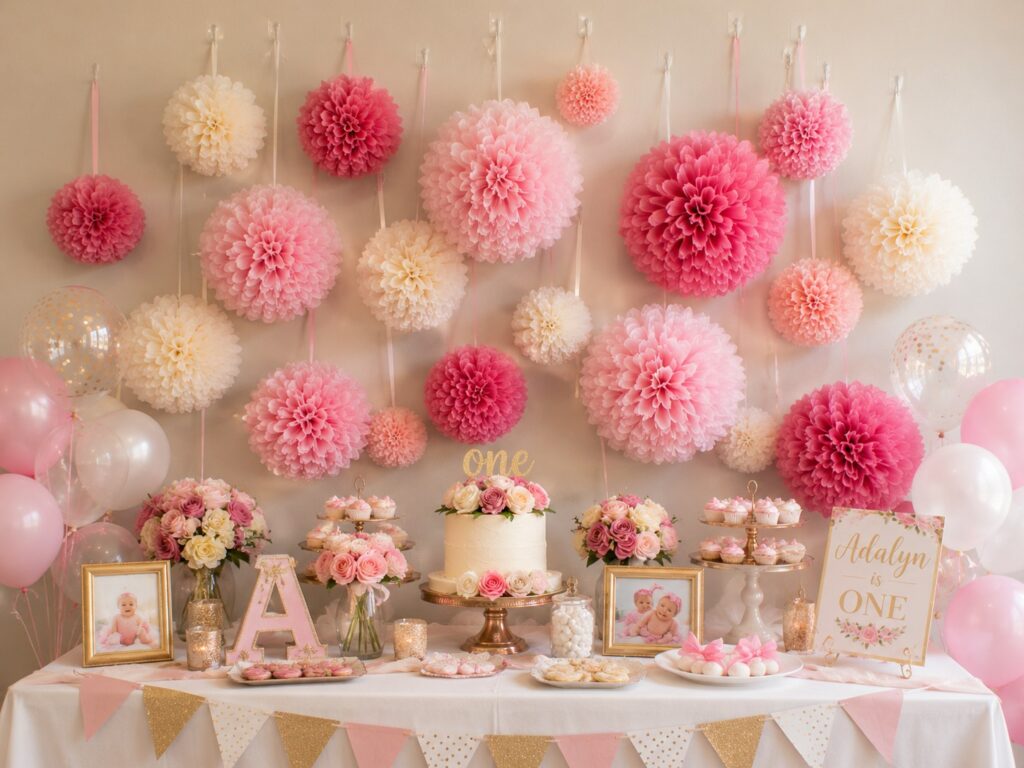
Place a small table directly in front of the backdrop and dress it with a tablecloth in your dominant color. Position the birthday cake, a small floral arrangement, or a personalized sign on the table. This instantly creates a layered focal point where the cake table and the backdrop work together as a single cohesive display rather than two separate elements.
This guide will help you: How to Make Cute DIY 4th of July Decorations With Your Kids (Step-by-Step)
Add metallic balloon clusters at the base of the backdrop on either side — gold, silver, or a metallic version of your dominant color. Balloons add height variation at the bottom of the display that balances the pom poms above. Alternatively, twist two or three large helium balloons into the pom pom backdrop itself for a mixed-media effect that feels full and luxurious.
Consider adding a personalized banner or letter board in front of the backdrop with the child’s name and age. Position a small rug and a low chair directly in front of the display to create a dedicated photo spot. Place a small sign inviting guests to take photos. Within minutes of the party starting, every parent will form an orderly queue to photograph their child in front of your backdrop which is the greatest possible compliment to your 30 minutes of effort.
Tissue Paper Pom Pom Backdrop Ideas for Every Party Theme
The same technique and structure adapts beautifully to every kids’ party theme imaginable. Here are specific color combinations for the most popular tissue paper pom pom themes.
For a Bluey party, use royal blue, sky blue, orange, and white pom poms in a mix of large and medium sizes. If you’re a unicorn party, combine lavender, blush pink, mint, and gold or white. For a rainbow party, use one pom pom in each color of the rainbow arranged in arching color order. Going for a dinosaur party, combine forest green, olive, mustard yellow, and terracotta. For a princess party, use soft pink, ivory, and gold. If the theme is a superhero party, use bold red, blue, and yellow with black accents. For a 4th of July party, combine red, white, and navy for a striking patriotic display.
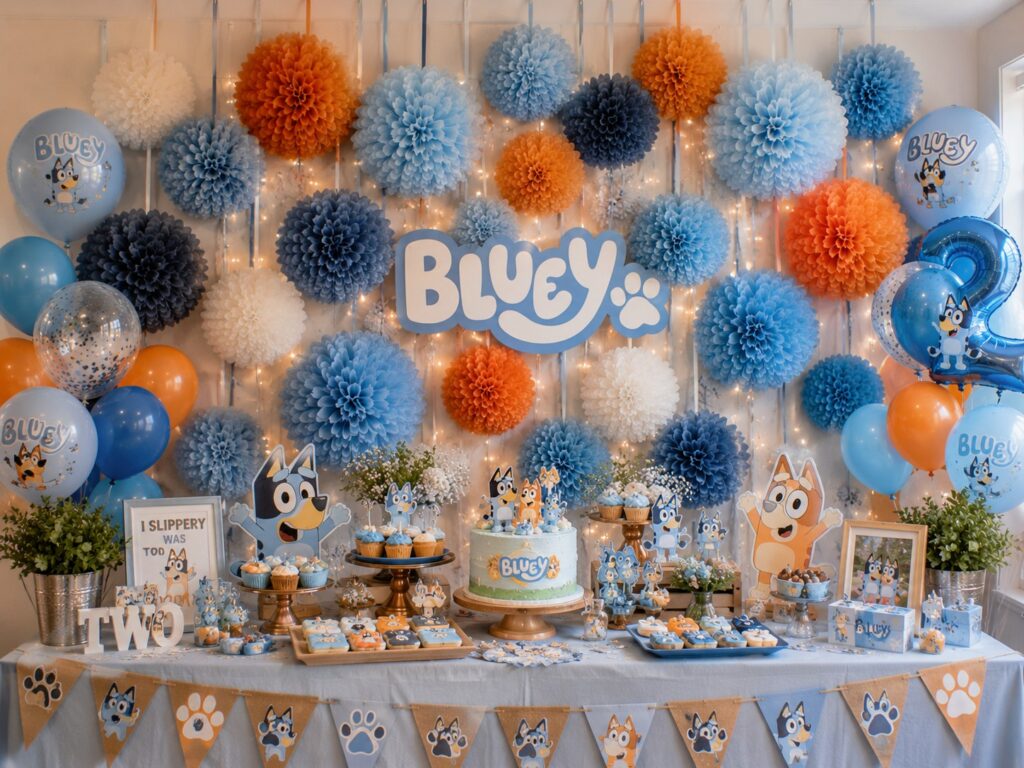
The Bluey-themed tissue paper pom pom backdrop deserves a special mention because the show’s color palette royal blue, sky blue, bright orange, and white translates extraordinarily well into a pom pom display. Large royal blue pom poms anchor the backdrop. Medium orange pom poms create the complementary contrast. Small white pom poms fill the gaps and add lightness. The result is instantly recognizable as Bluey-themed without a single character image in sight.
Common Mistakes to Avoid When Making a Tissue Paper Pom Pom Backdrop
Every first-time Tissue Paper Pom Pom Backdrop maker makes at least one of these mistakes. Knowing them in advance saves you time, tissue paper, and frustration.
Rushing the fanning step produces flat, thin pom poms that look underwhelming on the backdrop. Spend the extra 60 seconds fully separating every layer and shaping the ball generously the fullness is everything. A beautiful Tissue Paper Pom Pom Backdrop depends heavily on well-fluffed pom poms.
Using too few tissue paper sheets produces the same flat result. Eight sheets is the minimum for a decent pom pom. Ten to twelve sheets produces the full, lush look you see in professional party photos.
Come back to this: 4th of July Party Ideas for Kids: Red White and Blue Setup Guide
Hanging all pom poms at the same length creates a rigid, flat backdrop with no visual movement. Vary string lengths deliberately and generously for a dynamic, dimensional display that makes your Tissue Paper Pom Pom Backdrop look more polished and visually interesting.
Choosing too many colors without a unifying strategy produces a chaotic result that reads as messy rather than festive. Stick to three to four colors maximum and let the sizing variation add the visual interest.
Making all tissue paper pom poms the same size is the final common mistake. Three distinct sizes large, medium, and small create the textural variation and depth that separates an impressive Tissue Paper Pom Pom Backdrop from an ordinary one. The combination of varied sizes, coordinated colors, and proper spacing creates the professional party look most people are trying to achieve.
Frequently Asked Questions About Tissue Paper Pom Pom Backdrops
How many Tissue paper pom poms do I need for a full backdrop?
For a standard 6-foot wide backdrop at a single height, plan for 12 to 15 pom poms. For a fuller, multi-row backdrop or a wider display area, 20 to 30 tissue paper pom poms creates a more dramatic effect. Always make two or three extra — gaps are far easier to fill than redo.
How long does each tissue paper pom pom take to make?
Once you are in the rhythm after your first two or three tissue paper pom poms, each one takes approximately two to three minutes from stacking to hanging string attachment. A backdrop of 15 pom poms therefore takes 30 to 45 minutes in total well within the 30-minute target for a focused, supplies-ready maker.
Can I make tissue paper pom poms the day before the party?
Absolutely — and in fact, making them the day before is strongly recommended. Pom poms can be stored overnight in a large plastic bag or box without losing their shape. Making them in advance removes all time pressure on the day of the party and allows you to focus on food, setup, and enjoying the celebration.
How do I hang a Tissue Paper pom pom backdrop without damaging walls?
Removable command hooks and strips are the most reliable wall-safe hanging method. A tension rod requires no wall contact at all. Washi tape works for very lightweight small pom poms in a temporary display. Always check the weight rating of any hanging product before trusting it with your backdrop.
Can I reuse tissue paper pom poms after the party?
Yes — with careful removal and storage, pom poms can be reused multiple times. Gently compress each pom pom, store in a large airtight bag or box, and re-fluff before the next use. Colors may fade slightly with repeated use but the structure holds well through several parties.
What size tissue paper works best for Tissue paper pom poms?
Standard 20×26 inch tissue paper sheets are the ideal size for large and medium pom poms. For small pom poms, simply cut the sheets in half before stacking. Pre-cut tissue paper packs in standard sizes are widely available at craft stores and dollar stores in an enormous range of colors.
Do tissue paper pom pom backdrops work outdoors?
Tissue paper pom poms work outdoors in calm, dry conditions. Wind is the primary challenge even a light breeze causes pom poms to spin and tangle. If using outdoors, anchor the bottom of each pom pom with a small clip or light weight, position the backdrop in a sheltered area away from direct wind, and avoid using tissue paper pom poms in humid conditions as moisture causes tissue paper to tear and compress.
How do I make a two-color Tissue paper pom pom?
Stack alternating sheets of two tissue paper colors before folding. For example, layer one sheet of blue, one sheet of white, one sheet of blue, continuing until you have eight to ten sheets total. When fanned open, the two colors alternate throughout the pom pom creating a beautiful two-tone effect that adds visual complexity without requiring any additional technique.
Final Thoughts on How to Make a Stunning Tissue Paper Backdrop for a kids party
A Tissue Paper Pom Pom Backdrop is one of those rare party decorations that looks like it required far more skill, time, and money than it actually did. Guests will ask who made it. Parents will photograph their children in front of it for the entire party. Your child will point at it proudly and tell everyone that you made it just for them.
That moment your child’s pride and joy at something you created specifically for their celebration is worth every minute of the process. And with this tutorial, creating a beautiful Tissue Paper Pom Pom Backdrop takes just 30 minutes.
Check this out: 21 Enchanting First Birthday Themes for Girls You’ll Absolutely Love
Here are your action steps to get started today:
- Decide on your party theme and choose your three to four color palette right now.
- Count how many pom poms you need based on your display area when in doubt, make more.
- Pick up tissue paper in your chosen colors from your local dollar store or craft shop this week.
- Gather your scissors, wire, string, and hanging supplies before you sit down to make your pom poms.
- Make your pom poms the day before the party so the morning of is completely stress-free.
- Hang from the center outward, vary your string lengths, and step back to assess after every few additions.
- Style the space in front of the backdrop with a dressed table, balloon clusters, and a personalized sign.
One of the best things about a Tissue Paper Pom Pom Backdrop is how easily it can be customized for birthdays, baby showers, bridal showers, graduations, and holiday celebrations. Simply changing the colors and arrangement can completely transform the look to match your event theme while staying budget-friendly.
Which party theme are you making your Tissue Paper Pom Pom Backdrop for? Share in the comments below, and if this tutorial helped you, save it to your Pinterest party planning boards so other parents can find it when they need it most.