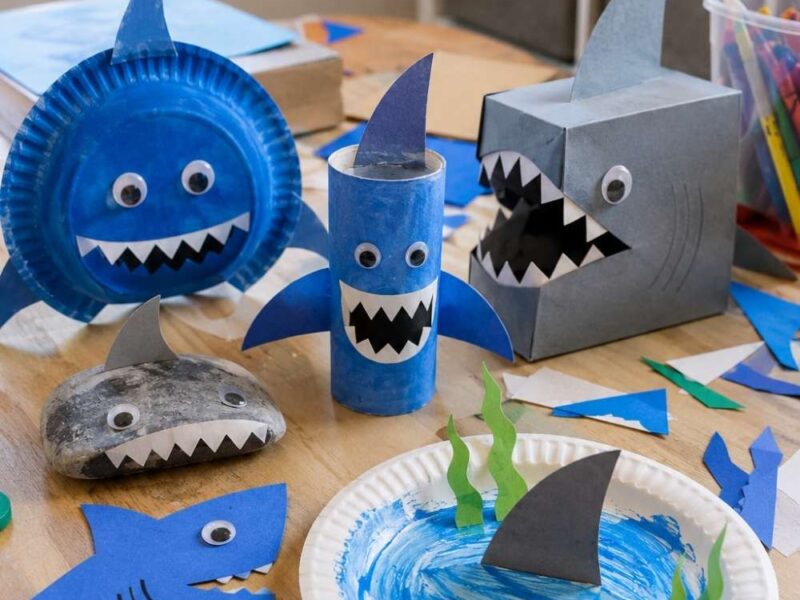
If your preschooler gets excited about ocean animals, this simple craft is a fun way to turn that curiosity into a creative learning activity. Sharks are one of the most fascinating creatures for young children, and making their own shark craft helps them learn while having fun. Best of all, this project uses basic supplies that many parents and teachers already have at home.
This easy tutorial walks you through a fun paper plate shark craft that little hands can help create from start to finish. Whether you’re planning a Shark Week activity, an ocean-themed lesson, or simply looking for a screen-free afternoon project, this craft keeps preschoolers engaged while helping develop important fine motor skills. Families looking for even more underwater inspiration may also enjoy these ocean crafts for kids for additional summer learning fun.
One reason parents love a paper plate shark craft is that it combines creativity with simple educational play. Children can practice cutting, painting, gluing, and following directions while learning about one of the ocean’s most interesting animals. If your child enjoys hands-on projects, these summer crafts for kids can provide even more easy activity ideas to keep little learners busy.
In this step-by-step tutorial, you’ll learn exactly how to make a paper plate shark craft for preschoolers using simple materials and easy instructions that are perfect for young children.
Why This Paper Plate Shark Craft Is Perfect for Preschoolers
Finding activities that are fun, educational, and simple enough for young children can sometimes feel difficult. Preschoolers love creating things with their hands, but they also need projects that match their attention spans and skill levels. That is one reason a paper plate shark craft remains such a popular choice for parents, teachers, and caregivers.
This easy ocean activity combines creativity with learning. Children paint, cut, glue, and decorate while building something they can proudly display afterward. Instead of simply talking about sharks, preschoolers get to create one from start to finish.
A paper plate shark craft also works for many different occasions. You can use it during Shark Week, summer learning activities, ocean-themed lessons, homeschool projects, classroom centers, or rainy afternoons at home.
Because the supplies are simple, preparation stays stress-free. Most families already have paper plates, paint, scissors, and glue available.
Parents who enjoy themed learning often pair ocean projects with summer crafts kids can make to create an entire week of hands-on activities.
Most importantly, preschoolers love sharks. The combination of sharp teeth, big fins, and ocean adventures captures their imagination. That excitement helps keep children engaged from the first step until the final display.
Materials You’ll Need
Before starting your paper plate shark craft, gather all supplies in one place.
Having everything ready before you begin prevents interruptions later.
You will need:
- 1 paper plate
- Gray paint
- Paintbrush
- White cardstock or construction paper
- Gray construction paper
- Pencil
- Child-safe scissors
- Glue stick or craft glue
- Googly eyes
- Black marker
- Newspaper or table covering
You may also want:
- Blue paper for an ocean background
- Stickers
- Glitter glue
- Blue crayons
- Ocean-themed stamps
Setting up an organized workspace helps preschoolers stay focused. It also reduces cleanup time after the activity ends.
How to Make an Easy Paper Plate Shark Craft for Preschoolers (Step-by-Step)
Step 1: Paint the Paper Plate
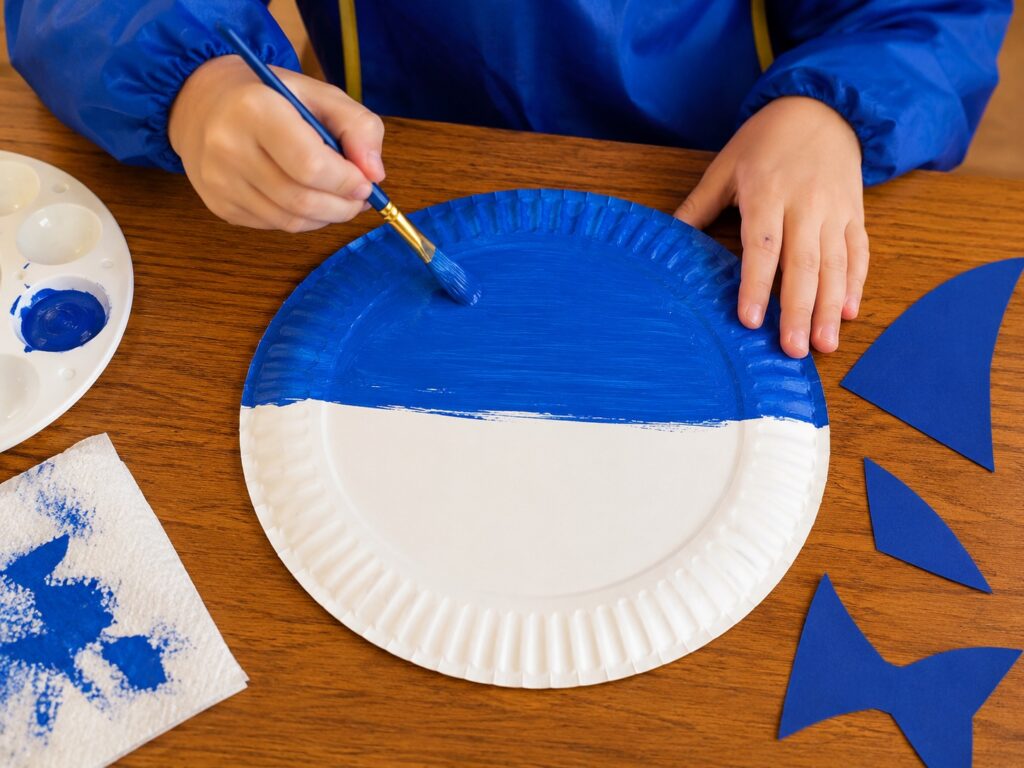
Start by turning the paper plate upside down.
Paint only the top half of the paper plate with your chosen shark color. Leave the bottom half white to create the shark’s belly.
Use long brush strokes to cover the plate evenly. Children can choose traditional shark colors like blue and gray or have fun with bright colors like pink, yellow, orange, or green.
The curved side becomes the shark’s body.
Pour a small amount of gray paint onto a paper towel, tray, or paint palette. Give each child a paintbrush and encourage them to cover the entire plate.
A complete coat of paint creates the best finished appearance.
Young children often enjoy this stage the most because they can freely explore color and movement.
Encourage long brush strokes rather than quick dabs. This approach helps strengthen fine motor skills while improving brush control.
Allow the paint to dry completely before adding the next pieces.
While painting, ask simple questions.
Where do sharks live?
Have you ever seen a shark?
What do sharks eat?
Conversations like these help turn a simple paper plate shark craft into an educational experience.
Children often enjoy learning facts while working on a project.
Families who love ocean themes frequently explore magical ocean crafts to extend learning beyond a single activity.
Allow the plate to dry completely before moving forward.
Step 2: Draw and Cut the Shark Fins
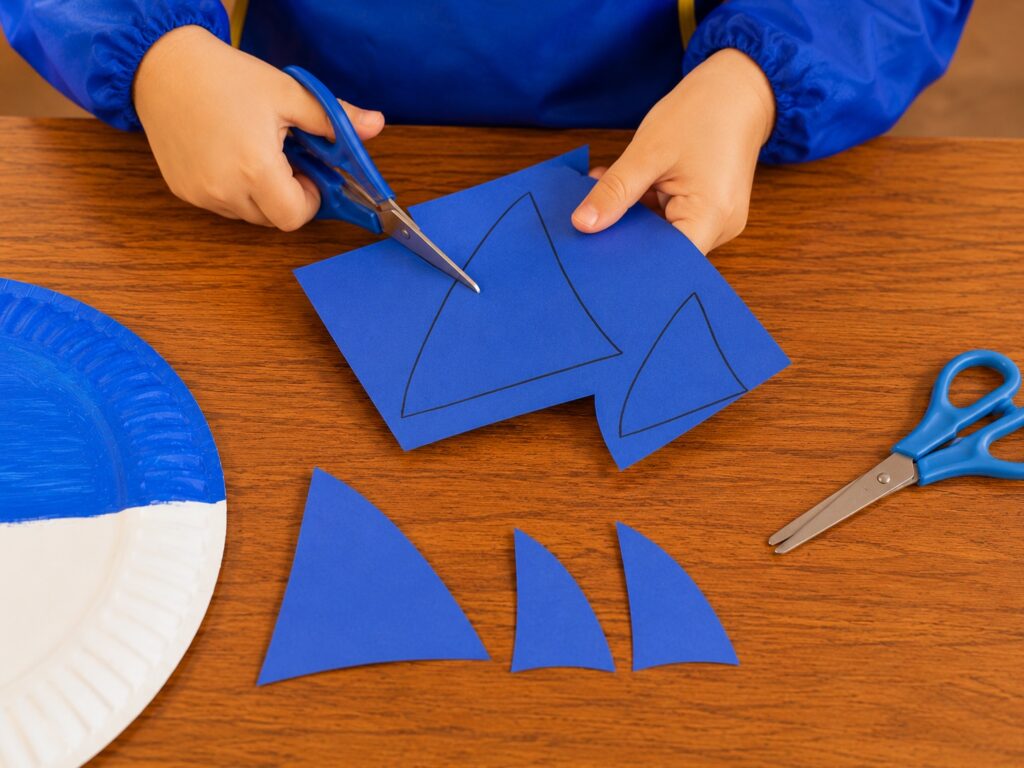
Once the paint dries, it is time to create the shark’s fins.
Use construction paper that matches your shark’s color.
Draw one large triangle for the top fin and two smaller triangle fins for the sides.
Keep the shapes simple. Preschoolers do not need perfectly shaped fins for their sharks to look adorable.
Carefully cut out each fin.
If children struggle with drawing, lightly sketch the shapes first and allow them to trace over the lines.
This gives them ownership while providing support.
Cut out all three fins carefully.
This step helps preschoolers practice scissor skills. Cutting simple shapes strengthens hand muscles that later support writing and drawing.
Remind children that sharks use their fins to help them balance and swim through the ocean.
Simple science discussions help make the paper plate shark craft even more meaningful.
Step 3: Create the Shark Tail
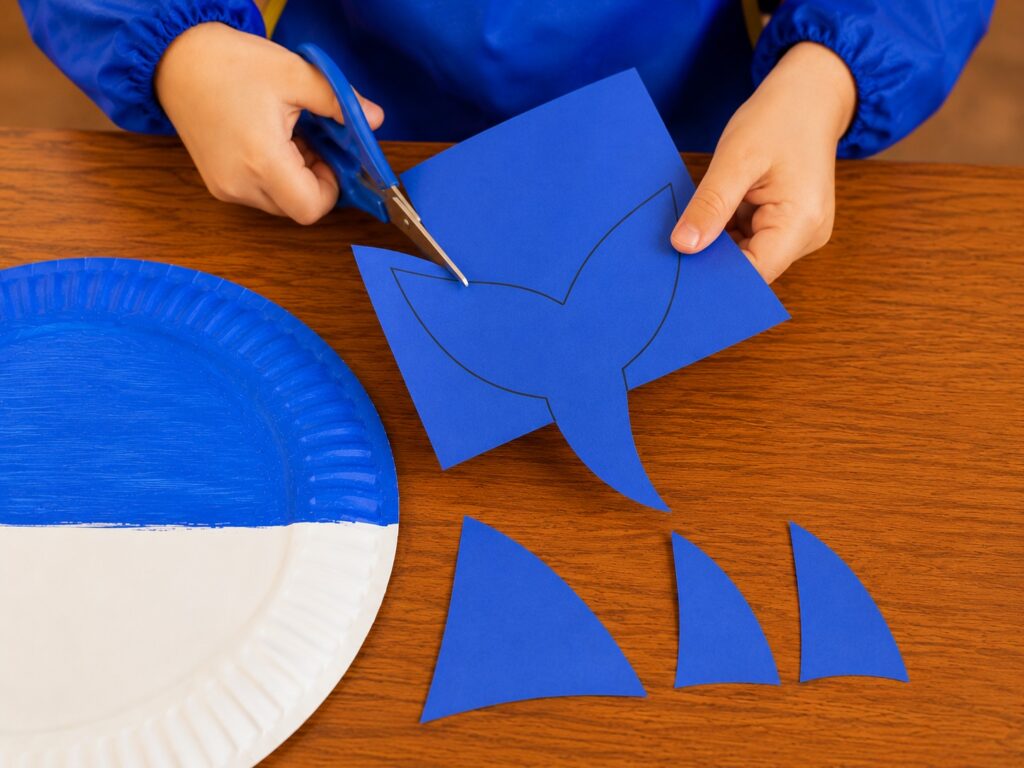
Every shark needs a strong tail.
The tail helps push the shark through the water. Using the same colored construction paper, draw a large V-shaped tail fin.
The tail should be wide enough to peek out behind the side of the paper plate.
Cut out the tail carefully.
Draw a simple V-shaped tail on gray construction paper. Make the tail large enough to match the size of the paper plate.
Cut it out carefully.
Children often notice that sharks move differently from many other fish. This creates a great opportunity to discuss ocean animals while crafting.
You can even show photos of different shark species.
Some sharks have larger tails while others have unique fin shapes.
This step encourages observation and curiosity.
Those small learning moments often become the most memorable part of the activity.
Step 4: Make the Shark Teeth
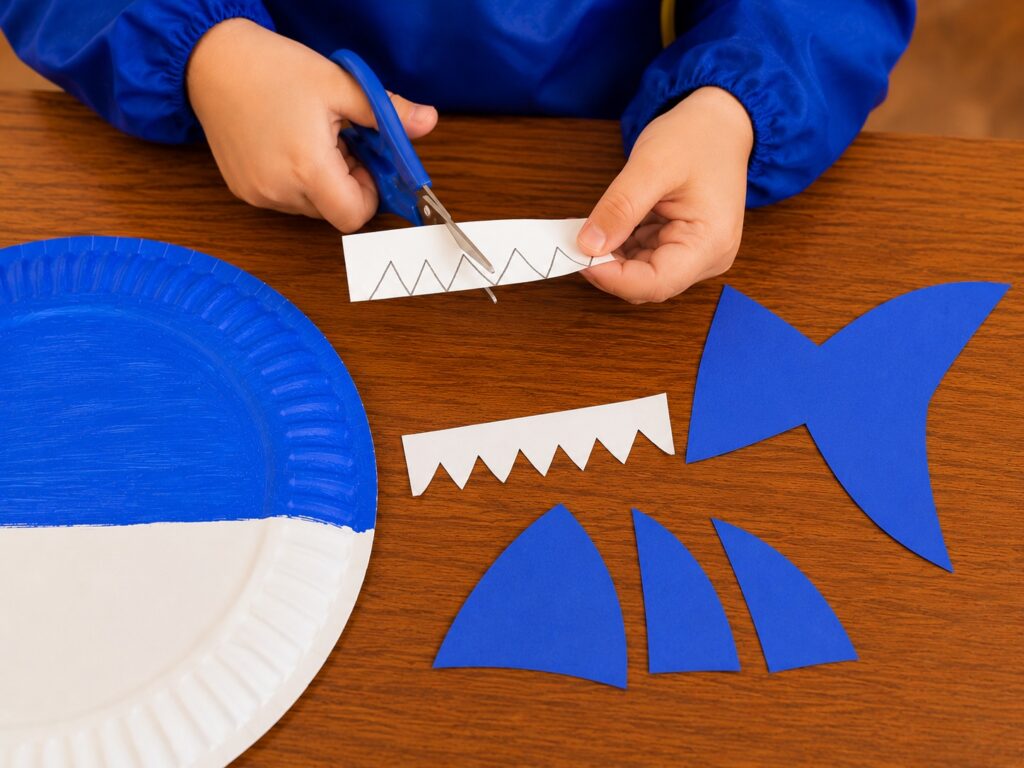
Cut a small piece of white paper.
Draw tiny connected triangles to create a row of sharp shark teeth.
Cut along the triangle edges.
The teeth should be small enough to fit inside the shark’s mouth.
Now it is time for one of the most exciting parts of the paper plate shark craft.
Shark teeth instantly make the project recognizable.
Take a strip of white cardstock and draw connected triangles along one edge.
The triangles should resemble rows of shark teeth.
Cut out the strip carefully.
Children may need help cutting around the points, especially younger preschoolers.
That is completely normal.
Focus on participation rather than perfection.
Once finished, hold the teeth up against the shark body to preview how everything will look.
Children often become excited at this stage because the shark starts coming to life.
Use this opportunity to share a fun fact.
Many sharks lose thousands of teeth during their lifetime and grow new ones regularly.
Preschoolers usually find this fact fascinating.
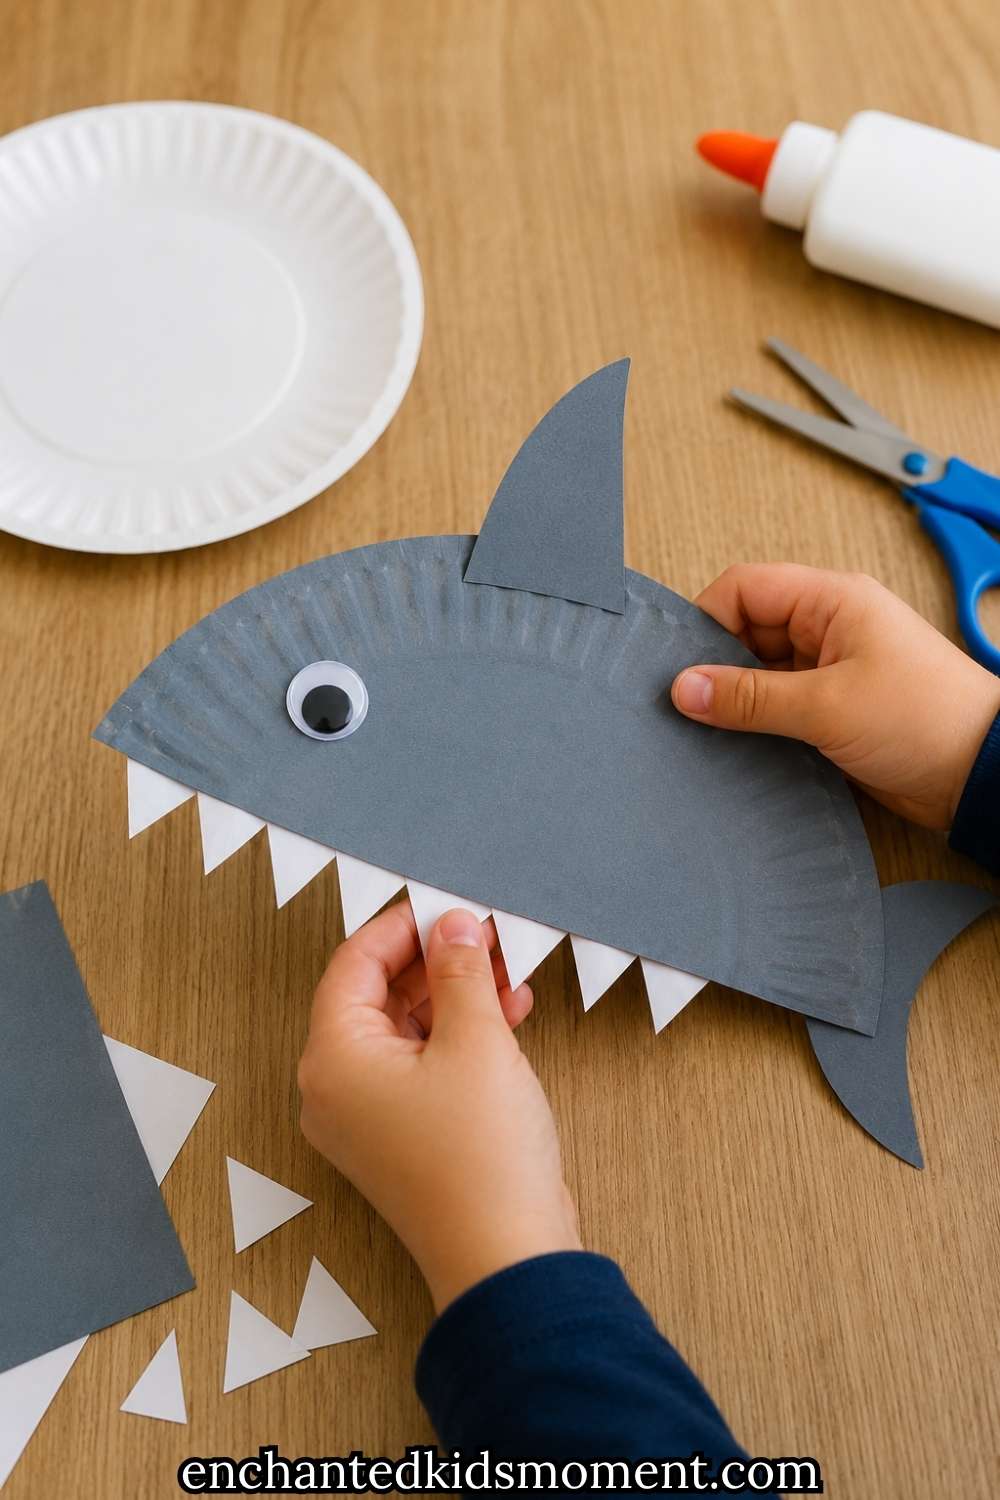
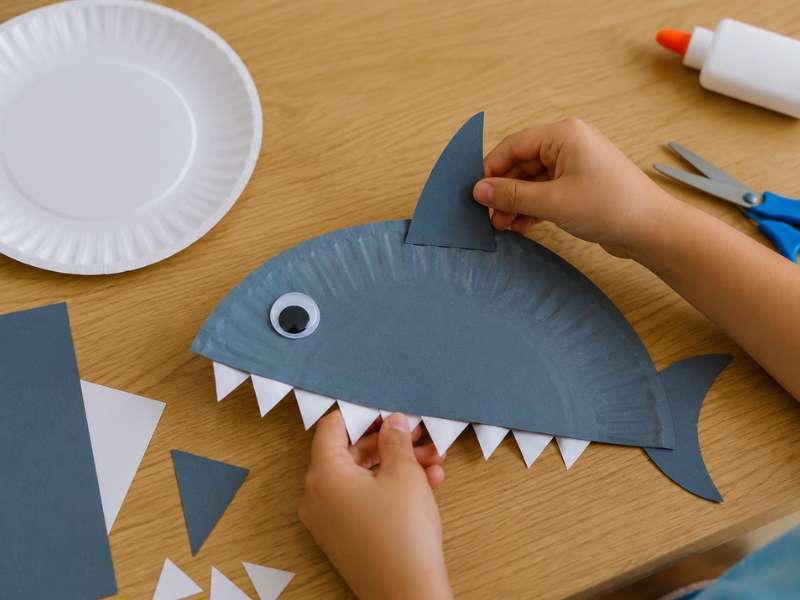
Step 5: Assemble the Shark Body
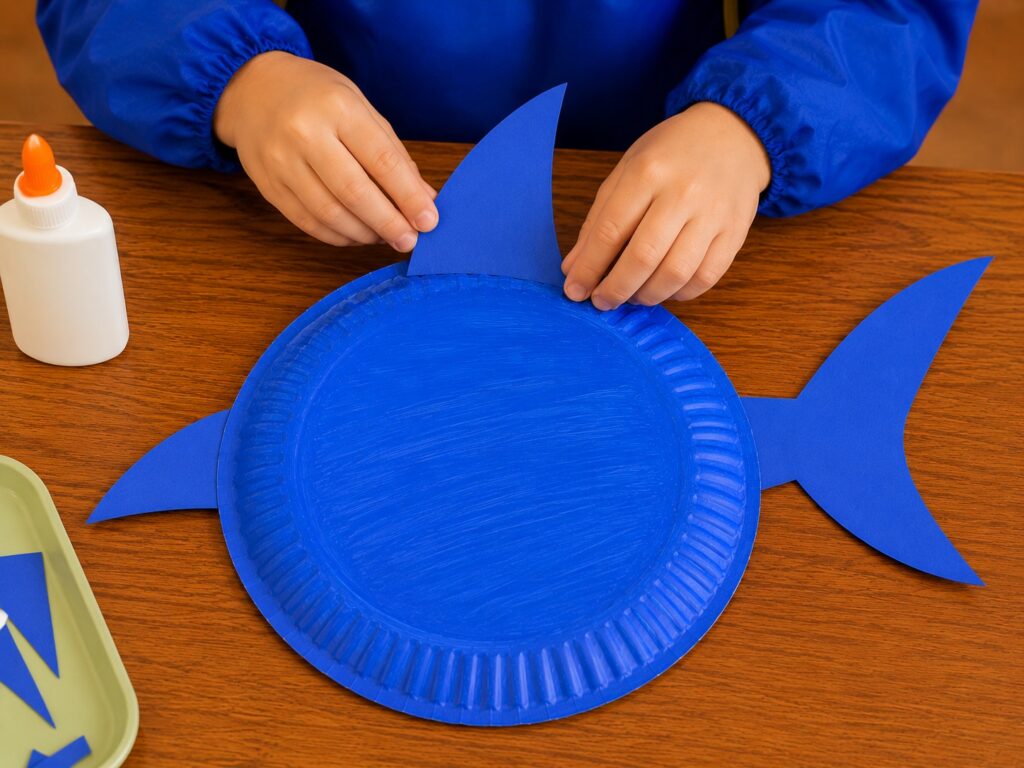
Now comes the most satisfying part of the paper plate shark craft.
Flip the paper plate over.
Glue the large top fin behind the upper edge of the plate.
Attach the two side fins and the tail behind the plate so they stick out around the edges.
At this point, your paper plate should begin looking like a shark.
Press each piece gently for several seconds.
Allow the glue time to bond properly.
Children often smile once they can recognize the shark shape.
This moment creates a strong sense of accomplishment.
The separate pieces finally come together to form a complete animal.
Parents who enjoy themed projects sometimes create Bluey crafts for kids because familiar shapes and characters help build confidence.
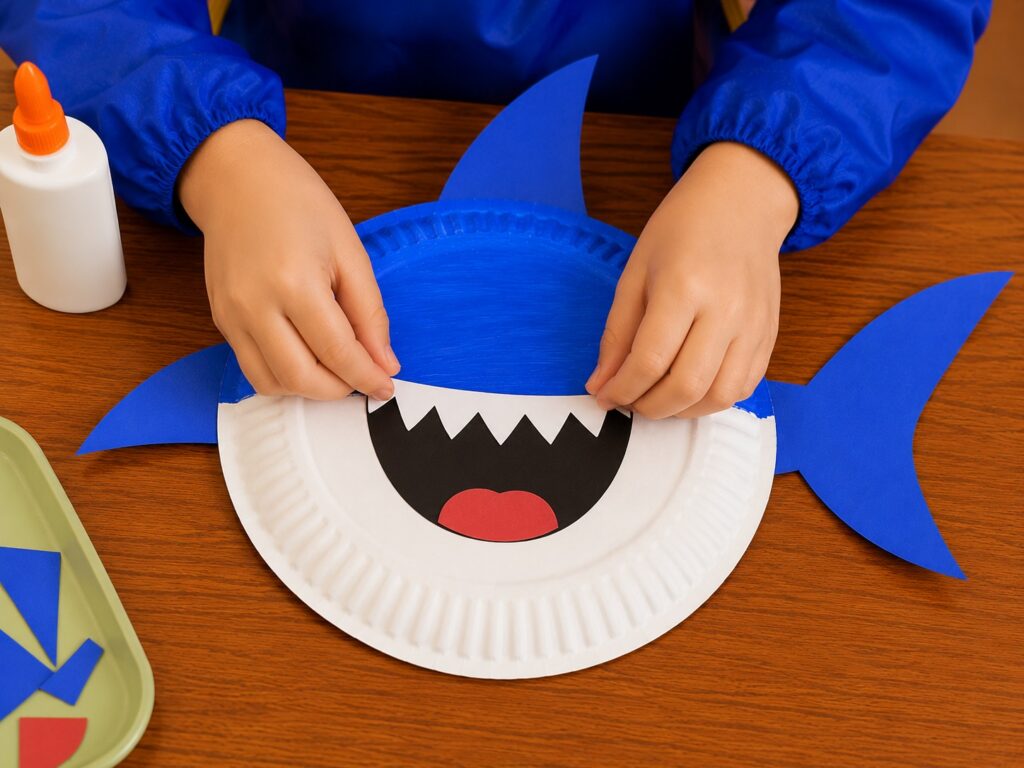
Step 6: Add the Shark Mouth
The shark now needs a mouth.
Turn the paper plate slightly toward you.
Cut a curved oval or semicircle shape from black paper to make the mouth.
Glue it onto the center of the white bottom section of the plate.
Attach the small triangle teeth along the top edge of the mouth so they look like a happy shark smile.
You can also add a tiny tongue with red or pink paper for extra personality.
This instantly transforms the shark’s appearance.
Many preschoolers begin pretending their sharks are swimming once the teeth appear.
Imaginative play naturally develops during creative activities.
Encourage children to make up stories about their sharks.
What is the shark’s name?
Where does it live?
What adventures does it have?
Storytelling strengthens creativity while making the paper plate shark craft even more engaging.
Step 7: Attach the Eyes
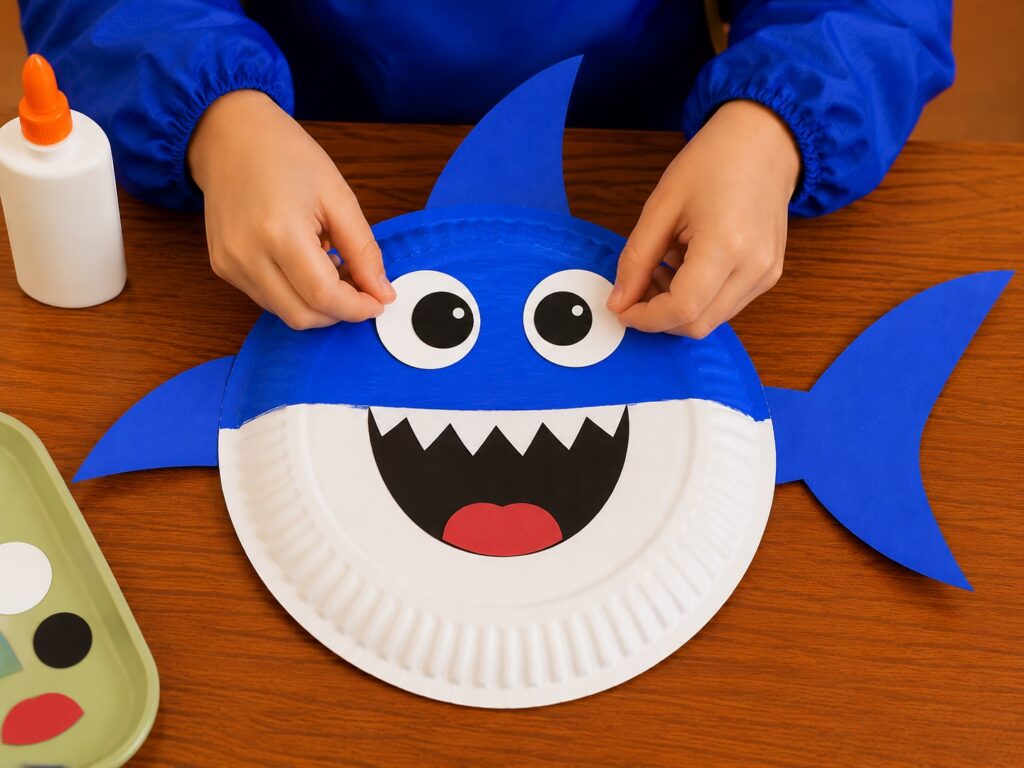
Every shark needs eyes.
Create large cartoon eyes using white and black paper circles, or use oversized googly eyes.
Glue them above the mouth on the colored section of the plate.
Move the eyes closer together, farther apart, or make them different sizes to give your shark a funny expression.
Googly eyes often become a favorite part because they add personality.
If you do not have googly eyes available, draw eyes using a marker.
Different eye sizes create different expressions.
Large eyes often look silly.
Small eyes can look serious.
Allow children to choose the style they prefer.
Giving children creative choices increases confidence and ownership.
Each finished shark becomes unique.
No two projects look exactly alike.
Step 8: Add Details and Decorations
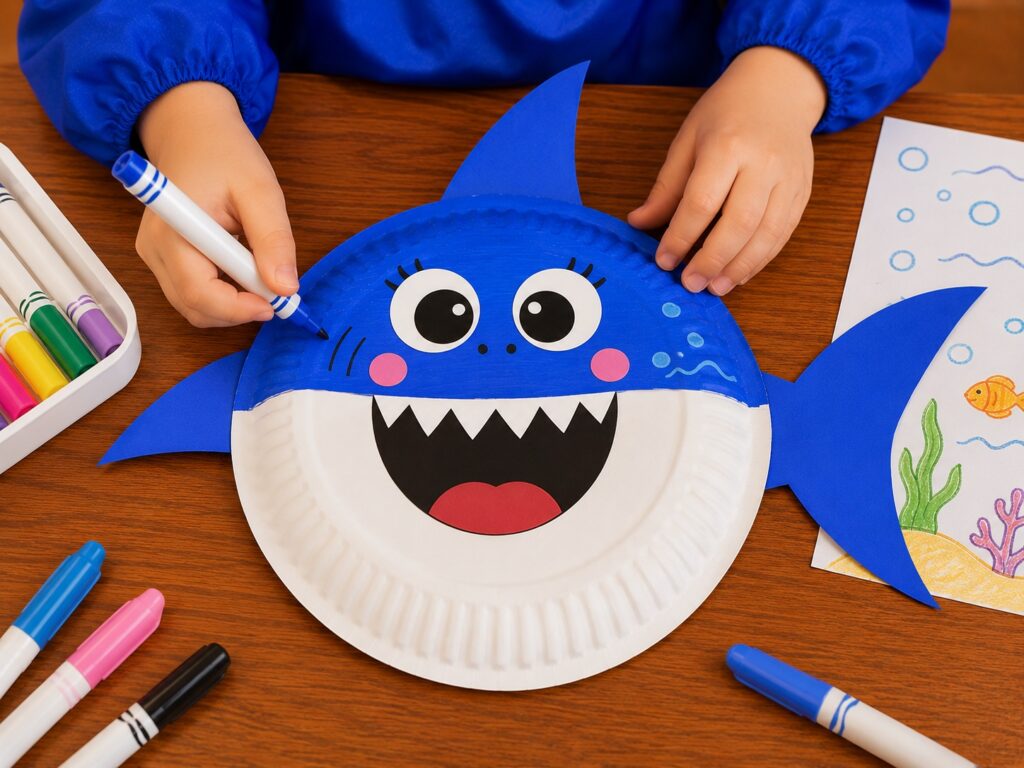
Now it is time to personalize the paper plate shark craft.
Use markers, crayons, paint, or colored pencils to add details.
Children can draw:
- Gills
- Ocean waves
- Fish
- Seaweed
- Coral reefs
- Bubbles
- Treasure chests
Some preschoolers prefer realistic sharks.
Others enjoy colorful fantasy sharks.
Both options encourage creativity.
Allow children to make their own artistic decisions.
Creative freedom helps build confidence.
Parents who encourage open-ended art projects often enjoy ceramic painting ideas because there are no right or wrong outcomes.
This stage often becomes the longest part of the activity because children enjoy decorating.
Step 9: Let Everything Dry
After decorating, place the shark somewhere safe.
Allow all paint and glue to dry completely.
Drying prevents fins, tails, and eyes from moving out of place.
Waiting can feel difficult for excited preschoolers.
Use this time to discuss sharks, read ocean books, or watch educational videos.
You can even ask children to name their sharks.
Many preschoolers enjoy introducing their finished creations to family members once everything dries.
The anticipation adds excitement to the experience.
Step 10: Display the Finished Shark
Once dry, display the shark proudly.
Hang it on a wall.
Place it on a bulletin board.
Use it as part of an ocean-themed classroom display.
Create a Shark Week decoration area.
Showcasing finished work builds confidence.
Children love seeing adults appreciate their creations.
A paper plate shark craft often becomes more than a simple project.
It becomes a reminder of learning, creativity, and quality time spent together.
Educational Benefits of This Paper Plate Shark Craft
This activity teaches much more than art.
Preschoolers develop several important skills while completing the project.
Painting strengthens hand muscles.
Cutting improves coordination.
Gluing encourages precision.
Following directions builds listening skills.
The paper plate shark craft also introduces ocean science concepts in a fun and approachable way.
Children learn through active participation rather than passive observation.
That hands-on approach often improves information retention.
The activity supports:
- Fine motor development
- Hand-eye coordination
- Creativity
- Problem solving
- Listening skills
- Early science learning
- Confidence building
- Independent thinking
These benefits make the project valuable in both homes and classrooms.
Shark Facts to Share During Craft Time
Adding facts keeps children engaged.
Here are several preschool-friendly shark facts:
- Sharks live in oceans all over the world.
- Baby sharks are called pups.
- Sharks use their tails to swim.
- Some sharks grow very large.
- Sharks have existed for millions of years.
- Sharks have several rows of teeth.
- Many sharks eat fish.
- Sharks can smell food from far away.
Sharing one fact during each step helps maintain interest throughout the paper plate shark craft activity.
Tips for Success
Keep expectations realistic.
Preschoolers learn through exploration.
Allow children to work at their own pace.
Use child-safe scissors whenever possible.
Protect work surfaces before painting.
Focus on fun rather than perfection.
Offer encouragement throughout the activity.
Most importantly, let children make creative decisions. Their finished shark may not look exactly like yours, but that uniqueness is what makes the project special.
A paper plate shark craft should feel exciting, educational, and enjoyable from beginning to end. When children create something with their own hands, they gain confidence, build skills, and develop a love for learning that extends far beyond a single craft project.
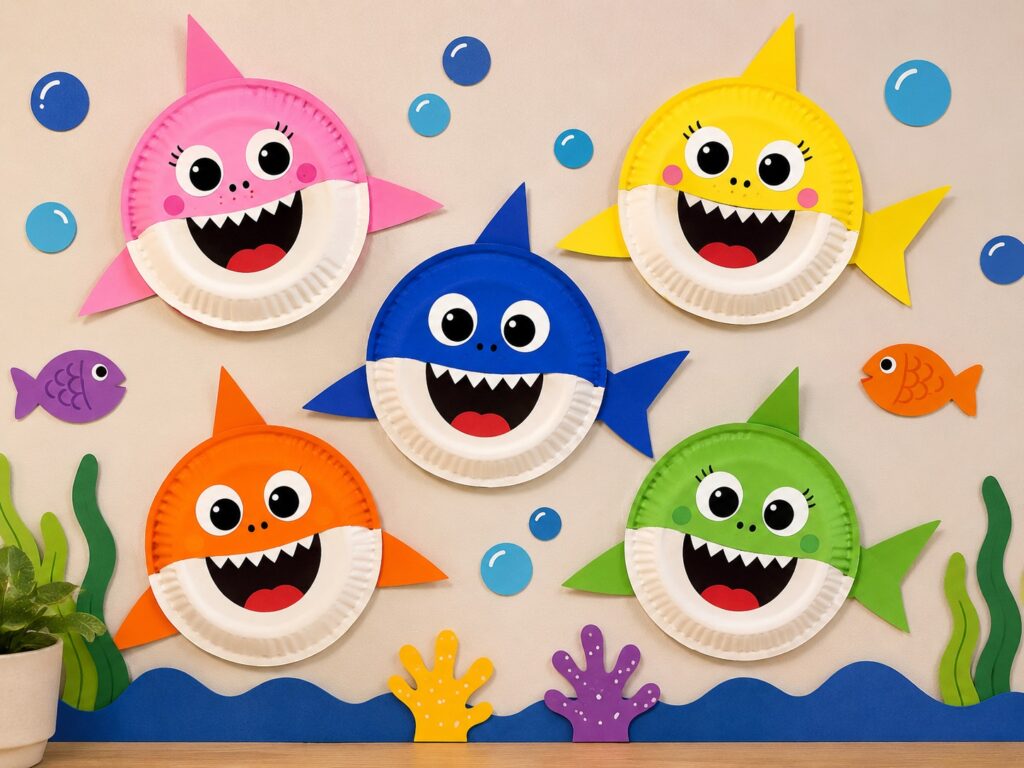
Shark Craft Variations to Try
One reason children love a paper plate shark craft is that it can look different every time.
Once preschoolers master the basic version, encourage them to experiment with new designs. Small changes keep the activity fresh while encouraging creativity.
For example, children can create a hammerhead shark by adding a wider head shape. They can also make a great white shark using darker gray paint and larger teeth.
Some children enjoy creating cartoon sharks with oversized googly eyes and colorful decorations. Others prefer realistic sharks inspired by photos from books and documentaries.
You can even create a whole shark family.
Make a large shark parent, medium-sized siblings, and tiny baby shark pups. Children often enjoy comparing the different sizes.
Families who enjoy animal-themed projects sometimes pair shark activities with rock painting ideas because both encourage creative exploration.
The more opportunities children have to personalize their work, the more connected they feel to the finished project.
Shark Week Extension Activities
A paper plate shark craft works perfectly during Shark Week.
Instead of stopping after one activity, build an entire week of ocean-themed learning around the project.
Day one can focus on making the shark craft.
Day two can include reading shark books.
Day three can feature shark-themed coloring pages.
Day four can involve shark movement games.
Day five can include simple shark science facts.
This approach helps children learn through repetition while keeping each day exciting.
Parents often notice that children remember more information when they combine crafts, games, and discussions.
Families looking for additional themed activities frequently explore ocean crafts for kids to create complete learning units.
The combination of art and education creates a memorable experience.
Classroom Activities Using the Shark Craft
Teachers can easily adapt this paper plate shark craft for group settings.
One idea involves creating a classroom ocean wall.
Each student makes a shark and adds it to a large underwater display. The finished mural becomes both decoration and a celebration of student work.
Another activity involves shark fact sharing.
After completing their paper plate shark craft, children can share one interesting fact they learned during the lesson.
Teachers can also incorporate counting activities.
Ask students to count shark teeth, fins, or ocean animals displayed around the room.
Simple activities like these reinforce learning while maintaining excitement.
Children often become more engaged when their artwork becomes part of the classroom environment.
Home Learning Activities
Families who homeschool or support learning at home can expand the paper plate shark craft into a complete educational experience.
Begin by reading a shark-themed story before starting the project.
Next, complete the craft together.
Afterward, watch a child-friendly educational video about sharks.
Children can then draw additional ocean animals that might live alongside their sharks.
This approach introduces multiple learning styles.
Some children learn best through reading.
Others prefer visual demonstrations or hands-on activities.
Combining methods helps reinforce understanding.
Parents who enjoy educational projects often gather inspiration from ceramic mug painting ideas because creative activities naturally support learning.
The goal is to make learning feel enjoyable rather than structured.
Shark-Themed Learning Games
Games help extend the fun long after the paper plate shark craft dries.
One simple game involves shark matching.
Create cards featuring different ocean animals. Children can match identical pictures while discussing each creature.
Another activity involves shark sorting.
Children sort animals into categories such as sharks, fish, mammals, and reptiles.
Movement games work especially well for preschoolers.
Ask children to pretend they are sharks swimming through the ocean. They can move fast, slow, or around pretend coral reefs.
You can also play a shark treasure hunt.
Hide paper fish around the room and encourage children to help their sharks find them.
These activities reinforce learning while keeping children active and engaged.
Creative Ways to Display the Finished Shark
Displaying artwork helps children feel proud of their accomplishments.
The simplest option involves hanging the shark on a bedroom wall or refrigerator.
However, there are many other creative display ideas.
Create a full underwater scene using blue bulletin board paper.
Add seaweed, fish, coral, and bubbles around the shark.
The display becomes an impressive ocean mural.
Teachers often use this approach in classrooms.
Families can create smaller versions at home.
Another idea involves hanging multiple sharks from the ceiling using string.
The sharks appear to swim through the room.
Children often love seeing their artwork displayed in unique ways.
Parents who enjoy decorative projects sometimes find inspiration in paper flower backdrop ideas because layered displays create visual interest.
Common Mistakes to Avoid
Even simple crafts benefit from a little preparation.
One common mistake involves rushing the drying process.
Wet paint can smear and cause frustration later.
Allow enough drying time before attaching additional pieces.
Another mistake involves cutting pieces that are too small.
Larger fins, tails, and teeth work better for preschoolers because they are easier to handle.
Avoid taking over the project.
Adults sometimes feel tempted to fix imperfections.
Instead, allow children to make their own creative choices.
The goal is learning and enjoyment rather than perfection.
A paper plate shark craft should reflect the child’s effort and imagination.
Finally, remember to keep instructions simple.
Breaking the project into small steps helps children stay focused and successful.
Why Preschoolers Love Shark Crafts
Sharks naturally capture children’s attention.
They look different from many other animals and inspire curiosity.
A paper plate shark craft allows children to explore that interest in a hands-on way.
The activity combines art, learning, and imaginative play.
Children enjoy painting, cutting, and decorating.
They also enjoy pretending their sharks are swimming through the ocean.
Many preschoolers continue playing with their finished sharks long after the activity ends.
That extended engagement makes the craft even more valuable.
Simple projects often create the strongest memories.
Final Thoughts
This paper plate shark craft offers the perfect balance of creativity, learning, and fun. Preschoolers strengthen important developmental skills while creating something they feel proud to display.
The activity works equally well at home, in classrooms, during Shark Week, or as part of a larger ocean learning unit. Families looking for additional creative inspiration may also enjoy Bluey crafts for kids when planning future hands-on activities.
Most importantly, remember that every shark will look different. Some children create realistic ocean predators while others design colorful cartoon sharks. Both approaches encourage imagination and confidence.
When children create with freedom and enthusiasm, they learn much more than how to make a craft. They develop problem-solving skills, creativity, and a love of learning that can last for years.
Frequently Asked Questions
What age is best for a paper plate shark craft?
Most children between ages three and six can complete a paper plate shark craft with minimal assistance.
How long does the project take?
Most preschoolers finish the activity in 30 to 45 minutes, depending on drying time and decorating choices.
Can I make this craft without paint?
Yes. Gray crayons, markers, colored pencils, or gray construction paper can replace paint.
Is this craft suitable for classrooms?
Absolutely. Teachers often use paper plate shark crafts during ocean units, Shark Week lessons, and summer learning programs.
What skills does this craft teach?
The activity supports fine motor development, creativity, hand-eye coordination, listening skills, problem-solving, and early science learning.
Can older children enjoy this activity too?
Yes. Older children often expand the project by adding more realistic details and creating larger ocean displays.
What can I do with the finished shark?
Display it on a wall, bulletin board, refrigerator, classroom display, or ocean-themed art corner.
How can I make the craft more educational?
Add shark facts, books, videos, counting activities, and ocean discussions throughout the project to reinforce learning.